Everything is now completed for my assignment and I must say that I have learned quite alot about photography. Not only have I learned how to use a camera with manual settings but I have also learned how to manipulate images to make them look better or completely different. I have also learned what different types of lenses there are and what they do and I have also learned about what photographers are out there that inspire me and are similar to my work.
Overall I feel that I have done very well with all of the units. I have taken my time to make them as detailed as I can and feel that I have totally understood everything about it without being confused at all throughout the whole assignment. My photoshoot I feel went very well. I think the decision of splitting it up into two parts was the right decision as I managed to get the same area but with a completely different climate (Snow) which I was very lucky at getting. Because of the weather conditions changing very dramitcally I was able to take some brilliant photographs of the River when it is snowing which made the overall shot look completely different to what it would look like if it wasn't snowing. If I was to go at this task again I would probably explore down the River a bit more to get more of a variety of shots which could lead to more unique photographs espiecially if it was snowing again.
My photoshop task I feel also went very well. I was able to on board any information I was told about the piece of digital manipualtion software which I used and was able to use it with minimal questions asked. I also took time and went onto youtube to do my own research on using the software for more digital manipulation techniques which I then used for the task. If I was to go at this task again I would definetly do more research to create even more heavier manipulated images, because of what I have seen there is limitless possibilities available.
My research was one of the tasks that took me the longest. This isn't because I had to research ten Photographers it was because I wanted to choose photographers that really inspired me and because there are so many different types of photographers out there this lead me to taking more time picking the right photographer. But who I found whilst doing alot of research I was very pleased with as they now inspire me even more to continue with my photography work. I didn't struggle at all writing about them and I was able to choose pictures which inspire me. If I was to go at this task again I would probably take even more time looking even further for photographers that inspire me because there are alot more out there.
Overall I am very happy with this assignment on a whole. I feel that I have completely understood every part of it and I will be taking this knowledge even further to help me progress with my career.
Showing posts with label D1. Show all posts
Showing posts with label D1. Show all posts
Saturday, 22 January 2011

Lenses Research
For this assignment we were also asked to explain different types of lenses and understand what they are used for. Below is an explanation of different lenses and what effects they do when taking photographs.
Standard Lense

The standard lense comes with most cameras as the default lense. Standard lenses are designed for taking basic shots with nothing too extreme. Although the standard lense isn't designed for the extreme it still has the ability to take some stunning shots.
Macro Lense

The macro lense is designed for close-up shots particulary familiar with close-up shots of flowers. They create such an effect that it is purely the item you want to take the photograph of that will be in focus and the background being blurred out. Some macro lenses can be quite expensive but you can also get macro filters which just go over the top of the standard lense.
Zoom Lense

Zoom lenses are designed for taking shots from long away. They are particulary used for landscape shots like wideangled lenses. You would be able to take a perfect shot which looks like you right next to the area you are shooting but actually you would be quite far away.
Special Purpose Lenses
Special purpose lenses are used to create shots that are not normally taken. Alot of them consist of taking shots to filter out certain aspects or colours in a shot. Below are a few special purpose lenses which can be used.
* Fish eye Lense
* Stereoscopic Lense
* Soft Focus
* Infared Lense
* UltraViolet Lense
* Swivel Lense
These lenses all create different types of effect like the fish eye lense for example. This lense creates a dark effect around the shot creating a bowl like effect for the shot. Ultra violet and infared lenses can also be bought in a filter form to put over a standard lense to get rid of certain colours from a shot which should'nt be there. Soft Focus lenses give a soft but not out of focus shot, particulary used in portrait shots. Swivel lenses rotate on the camera itself to give different angle when taking a photograph to give quite a unique effect. Streoscopic lenses take pairs of photographs which give a 3D type effect when viewed with approriate gear.
Standard Lense
The standard lense comes with most cameras as the default lense. Standard lenses are designed for taking basic shots with nothing too extreme. Although the standard lense isn't designed for the extreme it still has the ability to take some stunning shots.
Macro Lense
The macro lense is designed for close-up shots particulary familiar with close-up shots of flowers. They create such an effect that it is purely the item you want to take the photograph of that will be in focus and the background being blurred out. Some macro lenses can be quite expensive but you can also get macro filters which just go over the top of the standard lense.
Zoom Lense

Zoom lenses are designed for taking shots from long away. They are particulary used for landscape shots like wideangled lenses. You would be able to take a perfect shot which looks like you right next to the area you are shooting but actually you would be quite far away.
Special Purpose Lenses
Special purpose lenses are used to create shots that are not normally taken. Alot of them consist of taking shots to filter out certain aspects or colours in a shot. Below are a few special purpose lenses which can be used.
* Fish eye Lense
* Stereoscopic Lense
* Soft Focus
* Infared Lense
* UltraViolet Lense
* Swivel Lense
These lenses all create different types of effect like the fish eye lense for example. This lense creates a dark effect around the shot creating a bowl like effect for the shot. Ultra violet and infared lenses can also be bought in a filter form to put over a standard lense to get rid of certain colours from a shot which should'nt be there. Soft Focus lenses give a soft but not out of focus shot, particulary used in portrait shots. Swivel lenses rotate on the camera itself to give different angle when taking a photograph to give quite a unique effect. Streoscopic lenses take pairs of photographs which give a 3D type effect when viewed with approriate gear.
Research - Mike McFarlane
For my tenth and final piece of research I have chosen to research photographer Mike McFarlane. Mike McFarlane is a photographer who really inspires me. His work is very similar to what I would like to achieve in the many years that I do photography. Mike Mcfarlane started taking photographs in 2002 and has become a big name in landscape photography. He goes all over the country taking photographs of some of the most amazing photographs of what nature has to offer. Like always I will be choosing some of the photographs which I feel are my favourite pieces of his work and writing about why I have chosen them.
This is the first photograph that I came across whilst viewing Mike's work. One explanation for this piece of work is that it is simple but truley fascinating. As you can see one of his main focuses for this photograph was to get the viewer to see the natural beauty of the landscape surrounding this photograph but also to get the viewer to see the beauty of the rock placed right at the front of the photograph. With this placed here it changes the shot completely making it not only a landscape shot but a unique landscape shot. Very impressive, it goes to show that Mike likes to go the extra step with his photography.
 |
| The Miracle of Life |
 |
| Enlightenment |
This is the second photograph I have chosen for my research. This photograph in one word is stunning. Taken at the Loch Vaa in Inverness Scotland, this photograph shows how beautfiul the nature can be in the UK and also how perfect it is for photographs. Obviously taken with a wide angled lense, this photograph has everything in it for a landscape shot. This is most definetly the type of shot I would like to take eventually. With the hills in the background and the Loch in the foreground, this shot has absolutely everything in it. He also managed to take this shot at the right time with the sun shining down on the trees to the right of the shot making this photograph look even better than it already is.
 |
| Tombolo and White Horses |
For my third and final shot I have chosen of Mike's work I have chosen another photograph which really inspires me. This shot is another landscape shot which was also taken in Scotland. Again, it has a mixture of everything for a landscape shot. It has perfect brightness, perfect colour and everything that is included in the shot mixes perfectly with it. What I like the most about this photograph is how he managed to capture this when the tide was out. This makes the shot look amazing as you can see part of the tide is on the left and part of it is on the right creating a surrounding effect with the becah in the middle. This was the perfect time to take this shot because if the tide was in this would be a completely different picture.
Overall Mike McFarlane really inspires me. I will love to be able to take landscape shots like these especially with Rivers and surrounding landscapes because they are truley amazing.
Research - Alberto Seveso (Digital Manipulation Artist)
My next artist that I am going to be researching is also another digital manipulation artist. Alberto Seveso was born in Milan in 1978 and is a photo manipulation artist. He works on editing portraits of people and turning them in to weird and unreal but fascinating products of art. Alberto does alot of work for front cover magazines like mens health magazines etc. I will be choosing three of my favourite pieces of his work which inspire me and I will be writing about why I have chosen them.

This is the first picture that I found when looking at Alberto's work. This image is truely amazing with what he has done to it. This image looks like it has been taken from a front cover of a magazine. As you can see the original image would've been just a straight up portrait. As you can see Alberto's style of work is taking the portrait photograph and then designing his own artwork onto the portrait creating this amazing effect. On his chest it almost looks like a tatoo effect but when it moves up to the top of the head the editing gets a lot heavier and makes this image look amazing.

This is my second image that I have chosen for my research. This image is also very unique to anyone else digital manipulation work. As you can see again he would've taken an original portrait shot and he has really heavlily editied the original photograph using a piece of digital manipulation software. I would personally love to do this sort of work but it would take alot of practice. He has not only edited the shape of the origninal portrait but he has also added his own splatter like effect onto it aswell making it completely unique. Amazing.

Now, as you can see most of Alberto's work relate to a theme which is editing the persons face or body in a very unique and effective way. This third and final photograph which I have chosen is also an image which has been heavlily edited. Again, this was originally a portrait of someone which has been manipulated to create this awsome effect. This image was also probably used for a front cover of a magazine because it has that style to it.
Overall I feel that Alberto's work style is similar but they are all unique. Again I would love to create this masterpiece style of work as when the final products turn out like this they are truley rewarding.

This is the first picture that I found when looking at Alberto's work. This image is truely amazing with what he has done to it. This image looks like it has been taken from a front cover of a magazine. As you can see the original image would've been just a straight up portrait. As you can see Alberto's style of work is taking the portrait photograph and then designing his own artwork onto the portrait creating this amazing effect. On his chest it almost looks like a tatoo effect but when it moves up to the top of the head the editing gets a lot heavier and makes this image look amazing.

This is my second image that I have chosen for my research. This image is also very unique to anyone else digital manipulation work. As you can see again he would've taken an original portrait shot and he has really heavlily editied the original photograph using a piece of digital manipulation software. I would personally love to do this sort of work but it would take alot of practice. He has not only edited the shape of the origninal portrait but he has also added his own splatter like effect onto it aswell making it completely unique. Amazing.

Now, as you can see most of Alberto's work relate to a theme which is editing the persons face or body in a very unique and effective way. This third and final photograph which I have chosen is also an image which has been heavlily edited. Again, this was originally a portrait of someone which has been manipulated to create this awsome effect. This image was also probably used for a front cover of a magazine because it has that style to it.
Overall I feel that Alberto's work style is similar but they are all unique. Again I would love to create this masterpiece style of work as when the final products turn out like this they are truley rewarding.
Research - Marja Leena Pelho (Digital Manipulation Artist)
Other than taking the photographs for my project this is one of my favourite parts of this assignment purely because I look digital manipulation. After taking a good look at all of the digital manipulation artists I have decided to research an artist called Marja- Leena Pelho. I have decided to research this artist because her work has such a unique style. Ny this I mean she will take a photograph and then completely change it into something else with a very unique artistic style.
Marja- Leena is also interested in constructing aswell as her photography work but her photography and digital manipulation is her prime subject. She has won many awards for her work and her work really does inspire me to learn how to create such amazing images.
This was one of the images that caught my eye when I was looking through Maja- Leena's work. The final product consits of two images combined together using a piece of digital manipulation software to create a giant bottle like effect dropped into a forest type area. This image is truely fasinating because she has managed to create the image perfectly making it look like it has been dropped from the heavens. What I like the most about this image is how simple but effective it is. All you have to do for this image is get the two images and over lay them onto each other and then give them a nice touch up to make them blend together but it gives an amazing effect. This image is obviously an advertisment to say that this Cider is Cider from the heavens.
This is my second image that I took particular interest to. This is image in one word is spectacular. It is very heavily edited and looks amazing. From just a single portrait image she has managed to create such a desiring effect whoch must have been very difficult to create. She has managed to take a portrat photograph edit the person in the photograph and insert them into another photograph aswell creating a wildlife type effect. Very artistic.
Ever heard of the saying "money grows on trees" well apparently it grows on leaves aswell now with this image. This is the third and final image that I have chosen for my research on this artist. It is proberbly one of my favourites. Again two images have been taken and then blended into one final product. She has managed to take a photograph of a dollar bill and a close-up photograph of a branch from a bush and actually blend the dollar bill onto the leaves to make it look like they are growing on them. This is amazing as she has made it look perfect and real.
Overall this artist has a very unique editing style to many other digital manipulation artists. Alot of her other work is so heavily manipulated it actually looks like she has drawn them herself.
Marja- Leena is also interested in constructing aswell as her photography work but her photography and digital manipulation is her prime subject. She has won many awards for her work and her work really does inspire me to learn how to create such amazing images.
 |
| GuaranE |
 |
| Head3_b |
 |
| Dollar Tree |
Overall this artist has a very unique editing style to many other digital manipulation artists. Alot of her other work is so heavily manipulated it actually looks like she has drawn them herself.
Wednesday, 19 January 2011
Presentation Research
Amongst my research tasks for this assignment I have also been asked to not only research photographers but to research ways of presentation. Now, there are many different ways of presenting images so I will be describing a few different methods which are my favourite and ones which I may well use myself for my final product.
Firstly I will start off by describing the main way of presenting images which is printing. Printing is the most popular way of presenting images as it is proberbly one of the most open for opportunity. It is the most open for opportunity because you can do so much with a print rather than just show someone. Below are many different types of printing methods which can be used to print photographs:
Digital Printing
This is the most common printing method. This printing method is designed to transform a digital image from a computer onto a physical surface (Paper). This printing method is mainly used for making alot of copies of one piece of data, mainly used for photocopying.
Letterpress
This printing method is a very old style of printing. This is a style of relief printing, where the image being printing is raised from the surface. Like I said this is a very old style of printing as is slowly dieng out.
Electrostatic Printing
This printing method is very much like photocopying. The image colour is attached to a drum and is then blended with the paper alongside heat to produce the image. This method is similar to digital printing and is more cost effective.
These are just a few different ways of printing an image to present but there are many more. Now I am going to be describing different ways of presenting your image that has been printed out.
Framed Photograph
This is one of the most common ways of presenting your photographs to someone. Whether it be for advertising purposes or to show a client, framed photographs can't really go wrong as you are showing the client your work at a nice size. What also makes this method a very relible way of presenting is that you can have many different styles of frames to present your photographs in which can come to a huge advantage.
Multiples
This method is mainly used for portraits or a photoshoot with the same theme. It is designed so that you put most of your photos from a photoshoot that are similar into one frame. Quite a nice style of presenting images.
Book
This is also a very common style of presenting your work. Using a book style method to present your work is very effective as this is also very open for opportunity. With a book you can not only present your images but you can also add to them aswell with text for example to really catch the viewers eye. This is also a very proffesional method of presenting images.
Portfolio
This is the method that I will be choosing to present my work in. A portfolio is a collction of your best work to present. You can have many different styles of portfolio whether they be on an internet site or from an application from your iPad, you can go to some great proffesional extremes to presenting your portfolio. I feel that this is the most effective method of presenting your work because you can go that extra step to show your proffesionalism of your work.
So these are just a few different methods of presenting your work. There are proberbly hundreds of other different ways of presenting your work like basic presentation of images or using slideshows etc you could go on forever with the differnt methods alongside making up new ones, there are endless possibilities. The above are the ones which I feel are the most effective and methods which I will most likely use in the future to present my work.
Firstly I will start off by describing the main way of presenting images which is printing. Printing is the most popular way of presenting images as it is proberbly one of the most open for opportunity. It is the most open for opportunity because you can do so much with a print rather than just show someone. Below are many different types of printing methods which can be used to print photographs:
Digital Printing
This is the most common printing method. This printing method is designed to transform a digital image from a computer onto a physical surface (Paper). This printing method is mainly used for making alot of copies of one piece of data, mainly used for photocopying.
Letterpress
This printing method is a very old style of printing. This is a style of relief printing, where the image being printing is raised from the surface. Like I said this is a very old style of printing as is slowly dieng out.
Electrostatic Printing
This printing method is very much like photocopying. The image colour is attached to a drum and is then blended with the paper alongside heat to produce the image. This method is similar to digital printing and is more cost effective.
These are just a few different ways of printing an image to present but there are many more. Now I am going to be describing different ways of presenting your image that has been printed out.
Framed Photograph
This is one of the most common ways of presenting your photographs to someone. Whether it be for advertising purposes or to show a client, framed photographs can't really go wrong as you are showing the client your work at a nice size. What also makes this method a very relible way of presenting is that you can have many different styles of frames to present your photographs in which can come to a huge advantage.
Multiples
This method is mainly used for portraits or a photoshoot with the same theme. It is designed so that you put most of your photos from a photoshoot that are similar into one frame. Quite a nice style of presenting images.
Book
This is also a very common style of presenting your work. Using a book style method to present your work is very effective as this is also very open for opportunity. With a book you can not only present your images but you can also add to them aswell with text for example to really catch the viewers eye. This is also a very proffesional method of presenting images.
Portfolio
This is the method that I will be choosing to present my work in. A portfolio is a collction of your best work to present. You can have many different styles of portfolio whether they be on an internet site or from an application from your iPad, you can go to some great proffesional extremes to presenting your portfolio. I feel that this is the most effective method of presenting your work because you can go that extra step to show your proffesionalism of your work.
So these are just a few different methods of presenting your work. There are proberbly hundreds of other different ways of presenting your work like basic presentation of images or using slideshows etc you could go on forever with the differnt methods alongside making up new ones, there are endless possibilities. The above are the ones which I feel are the most effective and methods which I will most likely use in the future to present my work.
Wednesday, 12 January 2011
Research- Ansel Adams
My next photographer am going to research is another photographer that has inspired me to do River and surroundings photograhy. Ansel Adams photography is phenominal in the area that he works with. Below I will be explaining why this photographer has inspired me alongside a few of my favourite shots of his and all about this photographer.
Ansel Adams was born in 20th February 1902 abd died 22nd April 1984. He was an enviromentalist as well as a photographer. From when Ansel was a child at the age of 12 he was very interested in the environment. His original intented profession was being a pianist but as he was learning to play the piano he was also showing great artistic skill in photography which eventually replaced the pianist profession.
He started off with the photography from 1916 using a kodac no1 Box Brownie which his parents gave to him, and from there he didnt stop his photography. He explored everywhere pretty much to become what he was. Below are three of my favourite shots which I feel have inspired me for my work.
I will firstly start off with my favourite shot of his. This is a picture of the Tetons-Snake River. This picture in one word is phenominal and I would one day love to be able to take pictures like this. He has everything perfect in this shot. He has made the main subject (River) become the first thing the viewer looks at when this picture is viewed. He has managed to take the shot just as the sun is shining on the river to get a lovely reflection on the river and the mountains in the background. Also what I love about this picture is how he has managed to get the surroundings especially the background looking so brilliant with the mountains and trees at the side so the viewer will also be able to look at this aswell as being drawn to the river at first hand.
Overall this picture is absolutely stunning and is a huge inspiration for me to take these sort of shots because when they are taken like this they look amazing and faultless.
This is another shot of Ansel's work which I was very impressed with. This beautiful shot is of the Mcdonald Lake. As you can see from this picture and from the previous picture his pictures were taken in black and white. This, I feel can add a really nice effect especially with this sort of photography and they Ansels shots are taken makes them look even better. This shot of the Mcdonald Lake looks amazing with the background and surroundings looking so beautiful. The way he has taken this picture with the mountains going off into the far distance adds an amazing distant effect to this shot. Amazing.
The final picture I have chosen for my research is of the Merced River. This shot was taken in 1950. The River is at Yosemite National Park. Obviously this photograph had to be taken in black and white but I fell that this makes the picture look alot better. I dont really think that this picture would have the same effect if it was in colour. As you can see his main focus for this shot was to get the river to stand out but to also blend in the huge cliff aswell and he has done this perfectly. You can tell that Ansel was an environmentalist because he explored almost every location like this to take these sort of pictures. Also I love how the cliff in the far background is blurred. This is proberbly due to the camera that he is using but it adds an extra effect to the shot which actually suits it.
Ansel Adams was born in 20th February 1902 abd died 22nd April 1984. He was an enviromentalist as well as a photographer. From when Ansel was a child at the age of 12 he was very interested in the environment. His original intented profession was being a pianist but as he was learning to play the piano he was also showing great artistic skill in photography which eventually replaced the pianist profession.
He started off with the photography from 1916 using a kodac no1 Box Brownie which his parents gave to him, and from there he didnt stop his photography. He explored everywhere pretty much to become what he was. Below are three of my favourite shots which I feel have inspired me for my work.
 |
| Tetons-Snake River |
Overall this picture is absolutely stunning and is a huge inspiration for me to take these sort of shots because when they are taken like this they look amazing and faultless.
 |
| McDonald Lake |
 |
| El Captain (Merced River) |
Wednesday, 5 January 2011
Main Shoot- Part Two
As I stated in the post before we were asked to choose six photographs which are all thematic with each other. I decided to go with the theme of Rivers (River Trent) I decided to split my photoshoot into two parts. I did this to show the same area which I chose to photograph in two completely different climates. Luckily we had a massive downfall of snow so I thought this was the perfect time to go down for my second part of the photoshoot. My original plan was to go down when it was dark and gloomy with rainfall, but it decided to snow instead so this was a better opportunity for some amazing pictures.
Again, like before safety was top priority and it was even more dangerous this time as when I went down it was still snowing quite heavy so I had to be extra careful this time. Again for this I took a spare battery with me just incase I ran out of battery. I also took my tri-pod with me aswell although it was quite hard to use with the weather conditions. Below are my favourite pictures which I feel go well with my theme. I have also described what settings I have used and why I have used them for the shot.
 |
| 1/320, F-Stop 7.1, ISO 400 |
This is the first photograph I have decided to choose for my second part of the shoot. I have decided to choose this photograph because it has a great comparison with the third photograph I chose for the first photoshoot. This is great because it shows the same area but with a completely different climate which intern makes it a completely different photograph all together. On the other hand I have also chosen this photograph because it fits in very well with my theme. I managed to get a nice clear view of the river in the middle with a great surrounding landscape. I managed to position the camera perfectly to get the tree into focus alongside a clear view of the houses deep into the background. At first I chose to have the shutter speed set to 1/200 and the F-Stop set to 4.0. These settings that I initially chose were not right for the shot though. I found that after I had taken a few practice shots the photograph was appearing very bright, way too bright in fact. So I changed them to the settings labelled above. As you can see using these settings were perfect as I managed to get the right brightness alongside the right colour for the shot.
This is the second photograph I have chosen. When I was in the area for where my photoshoot was to take place I took a look around the area first to see if I could see anything different from my other photographs but still have my theme involved into the picture. I came across ten trees together next to each other with the River in front of them so this opportunity couldn't go a miss. I decided to take a few practice shots to begin with to find out what the final picture would look like. I did this to test out wether it was a good idea to shoot these trees or wether the photographs were a waste of time. At first I thought that it was a brilliant idea after viewing the first shot. I had my F-Stop set to 11. Obviously having this set to what it was made the background very visable. I was going to keep it as this setting but I wanted the viewer to mainly focus on the trees and River rather than looking at the deep background so I decided to change the F-Stop to 7.1. This made the background a little bit more out of focus but not too much so that it is completely out of focus.
My shutter speed was set to 1/250 to get the right amount of brightness. It was set to a little bit lower than the previous picture because it had stopped snowing as much and the light had dimmed a tiny little bit. At first I tried to use my Tri-Pod for this picture but I was really struggling to use it because of the snow on the ground, a few times it nearly fell over so I decided not to use it in the end and just hold the camera myself. Overall I am very happy with this picture because I fell that I have succeeded in what I wanted to do with this shot which was to make the viewer be automatically focused onto the trees and River.
This is my final photograph that I have decided to choose. This photograph that I took was right next to where I took the first one and was one of the last photographs I took on the shoot. The snow was starting to come down even heavier so I decided to go back to the original area of my photoshoot. This was again a very dangerous shot as I was right next to the river and could not see if there was any faults with the bank which made the shot even riskier so I took extra precautions when taking the shot. I wanted this shot to have everything in it. I wanted the river to be in full focus and look very sharp and I also wanted the background to be in focus aswell. This is why I chose to take the shot with an F-Stop of 10 because as you can see the background is in focus which adds extra detail to the shot. I decided to take a shot like this because my other shots were taken at an F-Stop that makes the background quite blurred out to make the viewer focus purely on the River and the near surroundings. Again, like before I did a couple of practice shots to make sure that I had a choice when choosing my final shot for this task. I tried a few more shots with a lower F-stop to see what the background looked like a bit blurred out but I decided not to go with that idea for this shot. I had to have my shutter speed set to 1/200 because it was getting duller by the moment when I was getting nearer to the end of my shoot so I had to let a little bit more light in but not too much because the snow was brightening up the shots anyway. What I also lie about this shot is the big stone piece with foliage growing on it in the middle of the shot. I feel that this goes very well where I have chosen to take the shot as it adds perfectly to the shot so the viewer will also be drawn to looking at this aswell as the main river itself. I also took this shot because there was a slope in the river just to the right of the shot which was creating a crashing effect at the bottom of the slope. Overall I am very happy with this shot that I have taken as it includes a bit of everything. The main piece it includes though is my theme which is the river which I have managed to add more too by taking this shot with the river and the slope in it.
 |
| 1/250, F-Stop 7.1 ISO 400 |
My shutter speed was set to 1/250 to get the right amount of brightness. It was set to a little bit lower than the previous picture because it had stopped snowing as much and the light had dimmed a tiny little bit. At first I tried to use my Tri-Pod for this picture but I was really struggling to use it because of the snow on the ground, a few times it nearly fell over so I decided not to use it in the end and just hold the camera myself. Overall I am very happy with this picture because I fell that I have succeeded in what I wanted to do with this shot which was to make the viewer be automatically focused onto the trees and River.
 |
| 1/200, F-Stop 10, ISO 400 |
Main Shoot- Part One
The aim for this whole unit is to show that I can use my camera on manual settings. By this I mean that I can show I understand how to use shutter speeds with depth of field to take photographs with the correct light and colour. As I stated earlier on in my blog my theme is Rivers and what surround them. I decided to go down to the River Trent for my first part of the photo shoot. In this blog I will be showing some of my favourite pictures that I have taken and talk a little bit about what settings I had the camera set to and why I have chosen them. After this I will be going out again and choosing three more pictures and talking about them. In a previous blog I have talked about precautions I have taken for this task because it can be quite dangerous due to there being a River as the main subject.
The time was around twelve o clock ish, so I had some good light to take my photographs. I went to a place called the Washlands where the main river (River Trent) was situated.
This is the first image I have chosen. Whilst looking through my images from the photo shoot this was one of the main ones that caught my eye. I managed to get the right light settings with a perfect picture of the river flowing. I also managed to get some nice surroundings in the background as well but the main focus is the River. I took a few shots exactly the same but used different settings. These settings that are labelled above were the ones that made the image look it's best. The shutter speed was set 1/320 due to how much light there was at the time. I tried having a 1/200 and 1/250 shutter speed but the pictures were way too bright. My main focus for the photograph was to have the picture bright but not too bright so even if I had a slightly faster shutter speed the photograph would still have looked very good. I managed to time the shot purley out of luck to capture a bird flying past. Like I said this was pureley luck at the time I was taking the shots but it makes the image look even better. For this shot I also used my Tri-Pod. I used the Tri-Pod because I wanted this picture to be perfect and not tilted or blurred. I think that overall this photograph relates to my theme very well and the settings that I chose alongside exposure to light were perfect for the shot.
This is the second photograph I have chosen. After many previous photographs I decided to go along the River a little bit to see if I could find any more different spots to take some nice photographs. I decided to try something a little different rather than just take a straight shot of the River. This was a complete bank shot as I didn't know what it would turn out like but I was quite surprised at the results. After looking through the shots of this area this was the one that I found stood out from the rest of them. I decided to go with the picture within a picture frame. I have lined up the two trees to create a frame with the river being the main subject in the centre. I decided to use a slower shutter speed for this picture because where I was standing there wasn't very much light so by using a slower shutter speed it brightened up the picture alot. I took two pictures of the same subject. The first photograph I took I used the flash so I could see the trees with all there colour. The second photograph I took was the one above without the flash. At first I was going to use the first picture I took with the flash but I decided that I liked the dark tree effect more because it makes the main subject (River) stand out a lot more. Again for this picutre I used my Tri-Pod so the image was completely stable. I feel that this image has turned out quite nice with the right exposure to light. I managed to get a nice reflection of the clouds and the sky from the river as well which stands out a lot more due the boldness of the trees.
This is the third photograph I have chosen as one of my favourites from the photo shoot. I had to take extra care when taking this shot as I was quite close to the river and there was a good chance of falling in if I had got any closer to the edge of the bank. I decided to choose this picture for my assaignment because it is what I like to call an all rounder. By this I mean it has a bit of everything in the shot alongside a nice colour set with the perfect brightness. The sun was just coming out when I was taking this shot so the original photograph I took didn't look that great because I had my camera set for the sun being cloudy with lowered light. So i increased the shutter speed from 1/200 to 1/320 to increase the speed of the shot and letting less light into it therefore getting a perfect picture with the right amount of brightness. At first I tried this shot with the tri-pod to see how it would go but I was worried that it might fall into the river and the practise shots I took didnt look great either so I decided not to use the tri-pod for this shot. My F-Stop was set to 7.1 with an ISO of 400 this enabled me to get the perfect sharpness for the picture with no blur what so ever. If I was to take this shot again I woujld proberbly try and not get the edge of the bank into the shot in the right hand corner of the shot. I would proberbly change a few settings on the camera aswell although this would not make much different to the current shot to make it better.
So these were the first three pictures that I have chosen and whhy I have chosen them. I think they are quite beautiful pictures of the River Trent and the surroundings of the River and it falls nicely into my theme which is Rivers. In my next photoshoot I will be returning to the same area but when the climate is alot different so there is a completely different feel to the photographs. This will be because of brightness and weather conditions.
The time was around twelve o clock ish, so I had some good light to take my photographs. I went to a place called the Washlands where the main river (River Trent) was situated.
 |
| 1/320, F-Stop 7.1, ISO 400 |
This is the first image I have chosen. Whilst looking through my images from the photo shoot this was one of the main ones that caught my eye. I managed to get the right light settings with a perfect picture of the river flowing. I also managed to get some nice surroundings in the background as well but the main focus is the River. I took a few shots exactly the same but used different settings. These settings that are labelled above were the ones that made the image look it's best. The shutter speed was set 1/320 due to how much light there was at the time. I tried having a 1/200 and 1/250 shutter speed but the pictures were way too bright. My main focus for the photograph was to have the picture bright but not too bright so even if I had a slightly faster shutter speed the photograph would still have looked very good. I managed to time the shot purley out of luck to capture a bird flying past. Like I said this was pureley luck at the time I was taking the shots but it makes the image look even better. For this shot I also used my Tri-Pod. I used the Tri-Pod because I wanted this picture to be perfect and not tilted or blurred. I think that overall this photograph relates to my theme very well and the settings that I chose alongside exposure to light were perfect for the shot.
 |
| 1/125, F Stop 6.3, ISO 400 |
 |
| 1/320, F-Stop 7.1, ISO 400 |
So these were the first three pictures that I have chosen and whhy I have chosen them. I think they are quite beautiful pictures of the River Trent and the surroundings of the River and it falls nicely into my theme which is Rivers. In my next photoshoot I will be returning to the same area but when the climate is alot different so there is a completely different feel to the photographs. This will be because of brightness and weather conditions.
Wednesday, 15 December 2010
Research- Joseph Squillante
I have been browsing the internet for sometime now looking for different photographers that I feel inspire me and some that I feel that are unusual types of photography. Now I am going to concentrate on photographers that relate to my theme which I think are really good.
The first photographer thats work I feel is brilliant is called Joseph Squillante. Joseph Squillante is a River photographer. He owns his own company that proffesionally take photographs of a certain River. The River is called Hudson River. The Hudson River is a 315 mile River that runs North to South through eastern New York, so there is plenty of opportunity to take many different photographs. Through this research I will be choosing the photographs that I think look great for the type of photography he does and why I like them.
I thought that I would start off with my favourite picture first because its one that I can relate to in my photoshoot. As I was looking through Joseph's Hudson River photos I came across this fantastic shot. The picture is of part of the Hudson River whilst looking through the trees and shrubury to create an amazin picture within a picture effect. The reason I chose this picture is because it relates to one of my picutres I have taken for the main task. I had also taken a shot very similar to this so I had to make this one of my favourites. He has also made the photo black and white to make the photo have a sort of winterey look but not too strong which I feel was the right decision.
The second photograph I have chosen is also one of my favourites. This photogrpah shows that even simplicty can even have great rewards. This photograph is a straight shot of the River with the landscape surrounding it. Theres nothing jumping out naking this picture different but just the picutre in itself is amazing thats for sure. Joseph has been taking pictures of the Hudson River for many years now and most of his pictures like this are stunning. Again he has also made this picture black and white to add an additional winter effect due to the time of year it was taken (December). He has also managed to get a nice reflection of the River with landscape and clouds being the main reflections. Like I said simple but fantstic.
The third and final photograph I have chosen is another photograph that looks absolutely fantastic. Again this photograph is of the river with the surrounding landscape. What I like about this picture though is that he managed to take the shot when it was misty. As you can see towards the back of the photograph near the tops of the trees there is a lot of mist which makes this picture unique to the others. I don't think I would have chosen this photograph if it wasnt for that because it makes the picture stand out more. This photograph was taken in 1983, again it looks to be in the winter period of the year which also makes the black and white desaturation look suitable.
The first photographer thats work I feel is brilliant is called Joseph Squillante. Joseph Squillante is a River photographer. He owns his own company that proffesionally take photographs of a certain River. The River is called Hudson River. The Hudson River is a 315 mile River that runs North to South through eastern New York, so there is plenty of opportunity to take many different photographs. Through this research I will be choosing the photographs that I think look great for the type of photography he does and why I like them.
 |
| Highlands Nook |
I thought that I would start off with my favourite picture first because its one that I can relate to in my photoshoot. As I was looking through Joseph's Hudson River photos I came across this fantastic shot. The picture is of part of the Hudson River whilst looking through the trees and shrubury to create an amazin picture within a picture effect. The reason I chose this picture is because it relates to one of my picutres I have taken for the main task. I had also taken a shot very similar to this so I had to make this one of my favourites. He has also made the photo black and white to make the photo have a sort of winterey look but not too strong which I feel was the right decision.
 |
| Lake Colden and Avalanche Pass |
 |
| Lake Tear of the Clouds |
Wednesday, 8 December 2010
Research- Tom Lowe
Moving away from water photography, I have decided to choose a photographer thats work is quite unbelievable. Tom Lowe's photography ranges from landscape photography to astronomy photography. It's his astronomy photography that inspires me the most.
Thomas is currently a student at the Brooks Institute of photography based in California. He shoots a number of different types of photography. He states that photography is great because there in no limit that one can achieve with a camera.
Like I have stated earlier in this blog it is his astronomy photography that inspires me. When I say astronomy photography I mean pictures of the galaxy and night sky taken from the ground.
This is my favourite image that actually made me want to research Tom Lowe. The Blazing Bristlecone shot is a picture of the night sky which quite obviously on a very clear night. The picture shows many of the galaxies stars and even the milky way. This photograph is absolutely stunning and it also won an award for an earth and space photography competition. I like the way he has managed to get the lighting perfect. I know that because it's dark and the night sky is bright that it was going to be easy to get the light right but the way that Tom has the light is just perfect for the shot. He manages to get the background trees looking like shadow and the tree at the front of the shot in a dark light. This enables the viewer to be more drawn to the night sky with the background still looking magnificent.
This is also one of Tom Lowe's awsome photographs. Again he has taken a picture of the night sky with trees in the foreground. The colour and lighting in this photograph in this photograph again are faultless. The way he has done it is that so you concentrate on the background (Night Sky) whilst still making the foreground look perfect.
The finla picture I have chosen from Tom Lowe's work is again a photograph of the night sky in all it's beauty. With the stars and the milky way easily visible Tom has managed to create a perfect photograph. He has also managed to get the reflection of the stars from the lake to create an even better photograph. As you can see when Tom does this type of photography he likes to have something in the foreground instead of taking a picture directly up into the night sky. This is brilliant as he manages to get different types of objects and landscapes into the shot. Even though they look like a shadow because of it being night time they fit perfectly into the photograph because of all the natural colours from the night sky.
So in conclusion I feel that Toms work is fantastic, showing off what is all around us and even adds our landscape around us from earth into his photographs making them look perfect to blend in with the night sky and galaxy.
Thomas is currently a student at the Brooks Institute of photography based in California. He shoots a number of different types of photography. He states that photography is great because there in no limit that one can achieve with a camera.
Like I have stated earlier in this blog it is his astronomy photography that inspires me. When I say astronomy photography I mean pictures of the galaxy and night sky taken from the ground.
 |
| Blazing Bristlecone |
 |
| Ancient Sky |
This is also one of Tom Lowe's awsome photographs. Again he has taken a picture of the night sky with trees in the foreground. The colour and lighting in this photograph in this photograph again are faultless. The way he has done it is that so you concentrate on the background (Night Sky) whilst still making the foreground look perfect.
 |
| Milky Way Behind Sierras Lake |
The finla picture I have chosen from Tom Lowe's work is again a photograph of the night sky in all it's beauty. With the stars and the milky way easily visible Tom has managed to create a perfect photograph. He has also managed to get the reflection of the stars from the lake to create an even better photograph. As you can see when Tom does this type of photography he likes to have something in the foreground instead of taking a picture directly up into the night sky. This is brilliant as he manages to get different types of objects and landscapes into the shot. Even though they look like a shadow because of it being night time they fit perfectly into the photograph because of all the natural colours from the night sky.
So in conclusion I feel that Toms work is fantastic, showing off what is all around us and even adds our landscape around us from earth into his photographs making them look perfect to blend in with the night sky and galaxy.
Research- Wayne Levin
For my next installment to the research area, I am going to be researching a photographer who is called Wayne Levin. Wayne Levin is also an underwater photographer, but he takes his photography to the next level. By this I mean he will take photographs which look beautiful as they are and then he may edit them to add that extra effect to finish the image off.

Wayne Levin doesn't just concentrate on underwater photography he also photographs divers, swimmers and surfers aswell. This is why I wanted to research him because he has a wide spread variety of water photography which is just what I am looking for.
 |
| Surfer with Ancient Board |
After taking a look through Levins work I thought I would start off with something a little bit different rather than go straight into his underwater photography. As I mentioned before Levin also likes to take pictures of surfers. This picture that I found was in my opinion one of my favourite surfer pictures he has done. He has captured the image perfectly and created the black and white effect to make the image ook old and to make it look like he is using and ancient board. The way this image was taken is absolutely brilliant, with perfect black and white colour and brightness I don't think he could've taken a better shot.

This is the second image that I found from Levins work. This picture is a fantastic shot of a shark swimming close to the camera with two other sharks in the background. Like I have said in my previous research when doing underwater photography you don't have to concentrate on getting pictures picture perfect but Wayne manages to get the perfect shot. Again here he has desaturated the image which creates an amazing effect. With the sunlight shining through the water onto the sharks, making this picture black and white suits it one hundred percent.
Wednesday, 24 November 2010
Photoshop Task 2
For this task I was asked to use different filters on my photographs. I was also asked to use two images and merge them together using different styles. Below you will find how I managed to create different filters and apply them onto my photograph.
Firstly though, I will be describing how I took two different pictures and merged them into one using different photoshop tools.

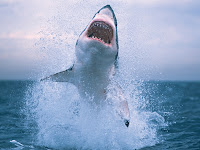
These were the two original images that I wanted to use. I wanted to take the shark out of the right picture and then place him into the other picture, so it looks like it's diving out of the river.

Firstly I used the magnetic lasso tool on photoshop and drew a line around what I wanted to cut out of the picture. After this had been done it selected what I have drawn as shown above. After I had done this I was able to move the picture that I had selected onto the other one just by clicking it and then dragging it onto where abouts I wanted it on the other photograph.

Ok, so this is what the picture looks like after it has been moved over from its original source onto it's new one. As you can see there is a lot of background from the pictures original source that has been brought over to the new one. So what I did was used the history brush to get rid of of all the picture detail I didn't want.
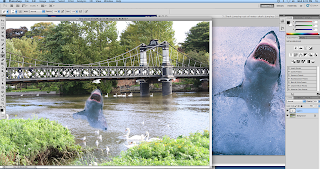
As you can see from the above picture it is already looking alot more smarter and cleaned up. I have also decreased the opacity of the image to create a more real look effect. All that will need doing now to create the perfect picture is to add more blur around the edges of the shark and change the colour around a little bit more.
For this task we were also asked to get two images and then split them up into different filters, six for each. For my first image I used my same original image from the first task. I used this photograph because I feel that has great potential to look quite good when using different filters.

So firstly what I needed to, although it is hard to see from the screenshot, was to select the area of the picture that I wanted to filter. So once this is selected I could then go into the menu and look at choosing one from many different filters. For my first filter I chose dry brush. This gives the picture a more hand drawn look.

This screenshot above shows the selected part of the image I want filtered and what it will look like. On the right hand side of the screenshot you can see that there many different filters within the filter I have selected. Because I wanted more of a hand drawn look I have selected coloured pencil. You can even change many different settings from the filter you have chosen to make the effect more stronger or weaker etc.

So as you can see from the above screenshot this is what the picture looks like so far from adding the first filter.

This is the second effect I have chosen for my image. This is a glass distortion filter. I have also chosen the ocean ripple filter within the original filter to create a drizzle effect. I weakened the effect though because it looked way too blurry originally.

This is the image after I have added the second filter. As you can see it doesnt look alot different to what it was before but it has drizzle effect when viewing the picture in full screen.

This image show the next filter that I have chosen. I decided to finish off the top half of the image with motion blur filter. I have also made the filter alot more stronger than the original setting to make the filter more blurry.


This next filter was a filter within the filter called sketch, graphic pen. The filter is called water paper filter. I chose this filter just purely for experimental purposes just to see what it does. Above is also what the image looks like so far.

The above screenshot shows the next filter that I used. This filter is called spatter. It is found in the brush strokes filter menu. Once I had selected spatter I then selected the filter dark strokes to create this fantastic dark sketch like effect.

This is the image so far. All that the photograph needs now is the final filter.

So for the last filter, I chose the radial blur filter. This filter is another blur filter which makes a circular blur effect. It is quite a random filter but has the potential to create some awesome effects.

This is the final image after the six different filters have been applied.

For my next picture (Shown above) I chose one of my favourites. It was a picture of a swan in the River Trent. For this picture I mainly wanted to concentrate on using different types of sketch effects.

For the first filter I chose the Bas relief filter. This filter is a heavy sketch feature which again can be modified to be weaker but it is designed to give a darker sketch effect.

This is what the image looks like after the first effect has been applied.

The second filter I decided to apply was called the chalk and charcoal filter. This filter does exactly as the name states. It gives the photograph a very nice chalky charcoal effect which when applied to a whole picture looks fantastic.

This is the photograph so far after having two filters applied to it.

This next filter I applied to my photograph was called torn edges. For this filter I had to turn down the contrast because with the contrast on it's original setting made the picture too bright so you couldn't really see anything.

This is the photograph so far after applying the third filter.

This is the fourth filter I decided to apply. This sketch filter is called note paper. I may have made this filter a bit too strong for what I am actually filtering. Due to there being water in the area I was filtering maybe I should've made the effect a little bit weaker to display the water a little bit clearer.

This is the photograph after the fourth filter has been applied.

This next filter that I have chosen is one of my favourites. This filter is called the chrome filter. It creates a fantastic chrome effect over the picture. I had to alter the detail in the filter due to it being too strong to start with. This sort of filter will look even better when it is applied to the whole of a photograph.

This is what the image looks like so far after the fifth filter has been applied.

The last filter that I chose is also another great filter. It is called the reticulation filter. This filter is a very dark sketch filter but it makes photographs look stunning. Again, this filter would look even better when applied to a whole picture not just part of one.

This is the final image after all six filters have been applied. As I have shown there are many different filters to apply to images and they all have there own settings to create many different effects.
For the final part of this task I was asked to get an image and apply text to that image. For this task I chose my picture of the swan in the River Trent that I used for the filters part of the task.
The first step is to click on the text tool which is on the left had side tool bar. I then selected horizontal text. I could then type any where on the screen.

Firstly When I typed the text onto the photograph the text was way too small so I highlighted the text then entered a text size that I wanted it to be as shown above. This text size was set to 600 Pt. This was the perfect text size for the photograph.

The above screenshot shows the different effect that i have applied to the text. This effect I used was called bulge. As you can see you can then change how strong you want the effect to be. Changing these settings will change how the text looks. You can also change the colour of the text as well but the original colour suited the my picture.
So overall there are many different effects and filters you can use on photoshop, whether you just want to improve a pictures quality of looks or completely manipulate the photograph you can do near enough anything using photoshop.
Firstly though, I will be describing how I took two different pictures and merged them into one using different photoshop tools.


These were the two original images that I wanted to use. I wanted to take the shark out of the right picture and then place him into the other picture, so it looks like it's diving out of the river.

Firstly I used the magnetic lasso tool on photoshop and drew a line around what I wanted to cut out of the picture. After this had been done it selected what I have drawn as shown above. After I had done this I was able to move the picture that I had selected onto the other one just by clicking it and then dragging it onto where abouts I wanted it on the other photograph.

Ok, so this is what the picture looks like after it has been moved over from its original source onto it's new one. As you can see there is a lot of background from the pictures original source that has been brought over to the new one. So what I did was used the history brush to get rid of of all the picture detail I didn't want.

As you can see from the above picture it is already looking alot more smarter and cleaned up. I have also decreased the opacity of the image to create a more real look effect. All that will need doing now to create the perfect picture is to add more blur around the edges of the shark and change the colour around a little bit more.
For this task we were also asked to get two images and then split them up into different filters, six for each. For my first image I used my same original image from the first task. I used this photograph because I feel that has great potential to look quite good when using different filters.

So firstly what I needed to, although it is hard to see from the screenshot, was to select the area of the picture that I wanted to filter. So once this is selected I could then go into the menu and look at choosing one from many different filters. For my first filter I chose dry brush. This gives the picture a more hand drawn look.

This screenshot above shows the selected part of the image I want filtered and what it will look like. On the right hand side of the screenshot you can see that there many different filters within the filter I have selected. Because I wanted more of a hand drawn look I have selected coloured pencil. You can even change many different settings from the filter you have chosen to make the effect more stronger or weaker etc.

So as you can see from the above screenshot this is what the picture looks like so far from adding the first filter.

This is the second effect I have chosen for my image. This is a glass distortion filter. I have also chosen the ocean ripple filter within the original filter to create a drizzle effect. I weakened the effect though because it looked way too blurry originally.

This is the image after I have added the second filter. As you can see it doesnt look alot different to what it was before but it has drizzle effect when viewing the picture in full screen.

This image show the next filter that I have chosen. I decided to finish off the top half of the image with motion blur filter. I have also made the filter alot more stronger than the original setting to make the filter more blurry.


This next filter was a filter within the filter called sketch, graphic pen. The filter is called water paper filter. I chose this filter just purely for experimental purposes just to see what it does. Above is also what the image looks like so far.

The above screenshot shows the next filter that I used. This filter is called spatter. It is found in the brush strokes filter menu. Once I had selected spatter I then selected the filter dark strokes to create this fantastic dark sketch like effect.

This is the image so far. All that the photograph needs now is the final filter.

So for the last filter, I chose the radial blur filter. This filter is another blur filter which makes a circular blur effect. It is quite a random filter but has the potential to create some awesome effects.

This is the final image after the six different filters have been applied.

For my next picture (Shown above) I chose one of my favourites. It was a picture of a swan in the River Trent. For this picture I mainly wanted to concentrate on using different types of sketch effects.

For the first filter I chose the Bas relief filter. This filter is a heavy sketch feature which again can be modified to be weaker but it is designed to give a darker sketch effect.

This is what the image looks like after the first effect has been applied.
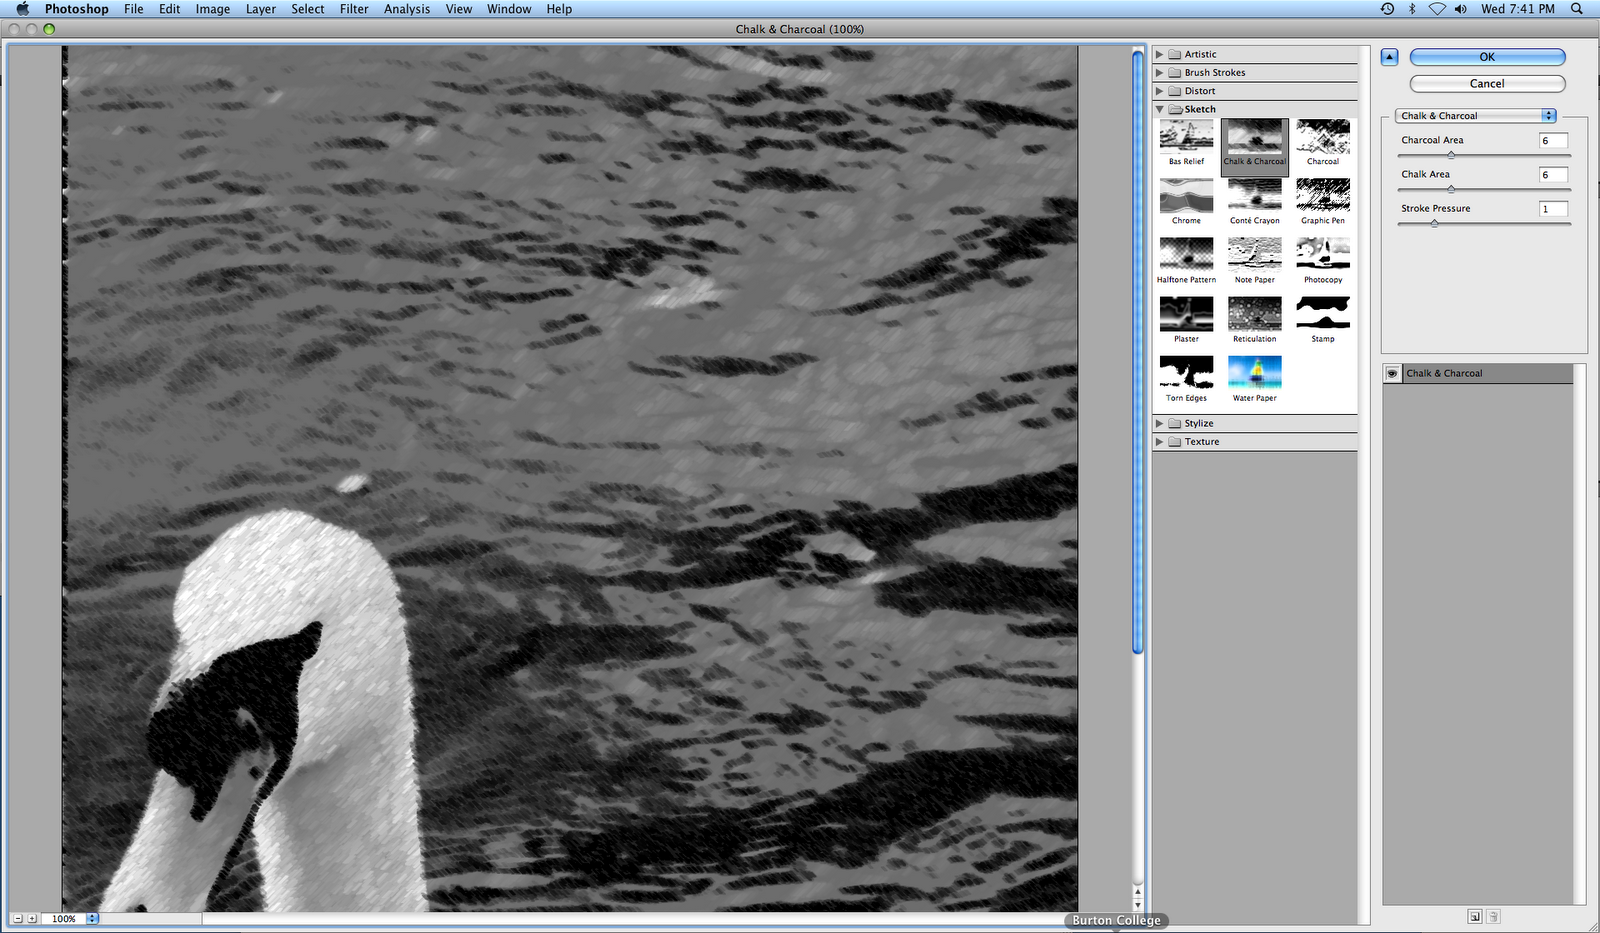
The second filter I decided to apply was called the chalk and charcoal filter. This filter does exactly as the name states. It gives the photograph a very nice chalky charcoal effect which when applied to a whole picture looks fantastic.

This is the photograph so far after having two filters applied to it.

This next filter I applied to my photograph was called torn edges. For this filter I had to turn down the contrast because with the contrast on it's original setting made the picture too bright so you couldn't really see anything.

This is the photograph so far after applying the third filter.

This is the fourth filter I decided to apply. This sketch filter is called note paper. I may have made this filter a bit too strong for what I am actually filtering. Due to there being water in the area I was filtering maybe I should've made the effect a little bit weaker to display the water a little bit clearer.

This is the photograph after the fourth filter has been applied.

This next filter that I have chosen is one of my favourites. This filter is called the chrome filter. It creates a fantastic chrome effect over the picture. I had to alter the detail in the filter due to it being too strong to start with. This sort of filter will look even better when it is applied to the whole of a photograph.

This is what the image looks like so far after the fifth filter has been applied.

The last filter that I chose is also another great filter. It is called the reticulation filter. This filter is a very dark sketch filter but it makes photographs look stunning. Again, this filter would look even better when applied to a whole picture not just part of one.

This is the final image after all six filters have been applied. As I have shown there are many different filters to apply to images and they all have there own settings to create many different effects.
For the final part of this task I was asked to get an image and apply text to that image. For this task I chose my picture of the swan in the River Trent that I used for the filters part of the task.
The first step is to click on the text tool which is on the left had side tool bar. I then selected horizontal text. I could then type any where on the screen.

Firstly When I typed the text onto the photograph the text was way too small so I highlighted the text then entered a text size that I wanted it to be as shown above. This text size was set to 600 Pt. This was the perfect text size for the photograph.

The above screenshot shows the different effect that i have applied to the text. This effect I used was called bulge. As you can see you can then change how strong you want the effect to be. Changing these settings will change how the text looks. You can also change the colour of the text as well but the original colour suited the my picture.
So overall there are many different effects and filters you can use on photoshop, whether you just want to improve a pictures quality of looks or completely manipulate the photograph you can do near enough anything using photoshop.
Subscribe to:
Posts (Atom)