Firstly though, I will be describing how I took two different pictures and merged them into one using different photoshop tools.


These were the two original images that I wanted to use. I wanted to take the shark out of the right picture and then place him into the other picture, so it looks like it's diving out of the river.

Firstly I used the magnetic lasso tool on photoshop and drew a line around what I wanted to cut out of the picture. After this had been done it selected what I have drawn as shown above. After I had done this I was able to move the picture that I had selected onto the other one just by clicking it and then dragging it onto where abouts I wanted it on the other photograph.

Ok, so this is what the picture looks like after it has been moved over from its original source onto it's new one. As you can see there is a lot of background from the pictures original source that has been brought over to the new one. So what I did was used the history brush to get rid of of all the picture detail I didn't want.

As you can see from the above picture it is already looking alot more smarter and cleaned up. I have also decreased the opacity of the image to create a more real look effect. All that will need doing now to create the perfect picture is to add more blur around the edges of the shark and change the colour around a little bit more.
For this task we were also asked to get two images and then split them up into different filters, six for each. For my first image I used my same original image from the first task. I used this photograph because I feel that has great potential to look quite good when using different filters.

So firstly what I needed to, although it is hard to see from the screenshot, was to select the area of the picture that I wanted to filter. So once this is selected I could then go into the menu and look at choosing one from many different filters. For my first filter I chose dry brush. This gives the picture a more hand drawn look.

This screenshot above shows the selected part of the image I want filtered and what it will look like. On the right hand side of the screenshot you can see that there many different filters within the filter I have selected. Because I wanted more of a hand drawn look I have selected coloured pencil. You can even change many different settings from the filter you have chosen to make the effect more stronger or weaker etc.

So as you can see from the above screenshot this is what the picture looks like so far from adding the first filter.

This is the second effect I have chosen for my image. This is a glass distortion filter. I have also chosen the ocean ripple filter within the original filter to create a drizzle effect. I weakened the effect though because it looked way too blurry originally.

This is the image after I have added the second filter. As you can see it doesnt look alot different to what it was before but it has drizzle effect when viewing the picture in full screen.

This image show the next filter that I have chosen. I decided to finish off the top half of the image with motion blur filter. I have also made the filter alot more stronger than the original setting to make the filter more blurry.


This next filter was a filter within the filter called sketch, graphic pen. The filter is called water paper filter. I chose this filter just purely for experimental purposes just to see what it does. Above is also what the image looks like so far.

The above screenshot shows the next filter that I used. This filter is called spatter. It is found in the brush strokes filter menu. Once I had selected spatter I then selected the filter dark strokes to create this fantastic dark sketch like effect.

This is the image so far. All that the photograph needs now is the final filter.

So for the last filter, I chose the radial blur filter. This filter is another blur filter which makes a circular blur effect. It is quite a random filter but has the potential to create some awesome effects.

This is the final image after the six different filters have been applied.

For my next picture (Shown above) I chose one of my favourites. It was a picture of a swan in the River Trent. For this picture I mainly wanted to concentrate on using different types of sketch effects.

For the first filter I chose the Bas relief filter. This filter is a heavy sketch feature which again can be modified to be weaker but it is designed to give a darker sketch effect.

This is what the image looks like after the first effect has been applied.
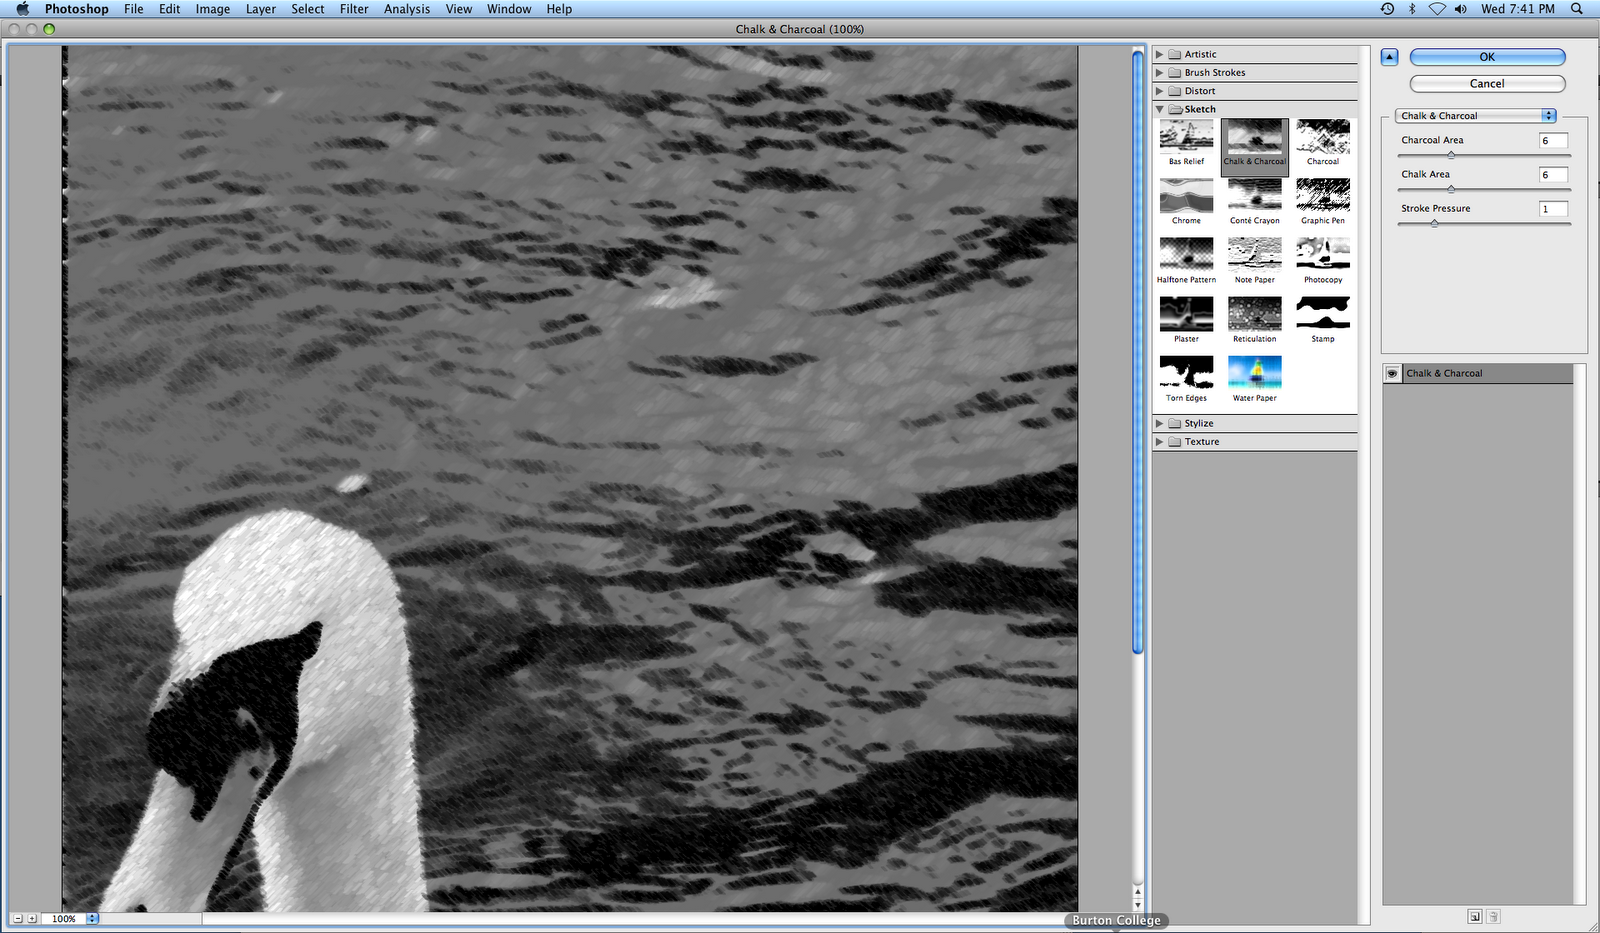
The second filter I decided to apply was called the chalk and charcoal filter. This filter does exactly as the name states. It gives the photograph a very nice chalky charcoal effect which when applied to a whole picture looks fantastic.

This is the photograph so far after having two filters applied to it.

This next filter I applied to my photograph was called torn edges. For this filter I had to turn down the contrast because with the contrast on it's original setting made the picture too bright so you couldn't really see anything.

This is the photograph so far after applying the third filter.

This is the fourth filter I decided to apply. This sketch filter is called note paper. I may have made this filter a bit too strong for what I am actually filtering. Due to there being water in the area I was filtering maybe I should've made the effect a little bit weaker to display the water a little bit clearer.

This is the photograph after the fourth filter has been applied.

This next filter that I have chosen is one of my favourites. This filter is called the chrome filter. It creates a fantastic chrome effect over the picture. I had to alter the detail in the filter due to it being too strong to start with. This sort of filter will look even better when it is applied to the whole of a photograph.

This is what the image looks like so far after the fifth filter has been applied.

The last filter that I chose is also another great filter. It is called the reticulation filter. This filter is a very dark sketch filter but it makes photographs look stunning. Again, this filter would look even better when applied to a whole picture not just part of one.

This is the final image after all six filters have been applied. As I have shown there are many different filters to apply to images and they all have there own settings to create many different effects.
For the final part of this task I was asked to get an image and apply text to that image. For this task I chose my picture of the swan in the River Trent that I used for the filters part of the task.
The first step is to click on the text tool which is on the left had side tool bar. I then selected horizontal text. I could then type any where on the screen.

Firstly When I typed the text onto the photograph the text was way too small so I highlighted the text then entered a text size that I wanted it to be as shown above. This text size was set to 600 Pt. This was the perfect text size for the photograph.

The above screenshot shows the different effect that i have applied to the text. This effect I used was called bulge. As you can see you can then change how strong you want the effect to be. Changing these settings will change how the text looks. You can also change the colour of the text as well but the original colour suited the my picture.
So overall there are many different effects and filters you can use on photoshop, whether you just want to improve a pictures quality of looks or completely manipulate the photograph you can do near enough anything using photoshop.
No comments:
Post a Comment