Thursday, 21 October 2010

Research-Martin Waugh

My next photographer I am going to be researching is Martin Waugh. Martin Waugh also takes different kinds of water photography. The main type of water photography he specialises in is close up water droplets. This type of water photography looks great when taken correctly and Martin Waugh does it perfectly. Martin also takes photographs of seas and other sources of water but I am only going to focus on his close up work because that is what inspires me the most.

"Throughout history, water has calmed the soul, soothed the spirit and healed the wounded. Martin's free-flowing photography evokes images from rolling, rhythmic oceans to drops of water falling upon a lake, taking one on a spiritual journey bounded only by imagination"

Taken from www.liquidsculpture.com/the_artist.htm


This piece of information shows that Martin really concentrates on his work and the elements that build up to make his work possible. He believes in combining art and science to create natures infinite beauty (water).


The Classic
 This is one of his photos that is one of his normal water droplet photos. Quite simply he has taken a shot of the water droplet as it hits the water with a macro lense. But with the background colour it just looks fantastic. As I said before he takes pictures like this because he has stong beliefs in the scientific sides to water aswell as producing photography to prove it, brilliant!


Open Hand


This photograph in one word is phenominal. Martin Waugh has taken many different water droplet photos that quite amazingly look like different objects. Personally I do not know how he does it but in this photograph which is one of my favourites, he has managed to create broken wine glass effect. I guess that its all down to gravity and science in which way the water is dropped to create the different effects.

The classic photograph taken from http://www.diliaolsson.com/
Open Hand taken from http://www.portlandonline.com/

Monday, 18 October 2010

Research- Andy Goldsworthy

Throughout this course I will be writing about different photographers each that either have influenced me because there work is the same as mine or I like the work that they have done.

The first photographer I will be writing about is Andy Goldsworthy. The reason I am interested in his work is because he has taken some fantastic shots of rivers which is in line with the same type of work that I am doing. When I look at his photo's I feel that he hasnt gone out to extremes on his photographs but they look really nice for the subject.

Andy Goldsworthy was born on July 26th 1956. His work concentrates in many different areas ranging from icicles and snow to different types of water photography like rivers and the sea etc. He has often used different materials in his work to create a perfect picture.

This is one of my favourite photographs I found by Andy Goldsworthy. As you can see his style of work is unique as he uses objects to create random but really good structures for the photograph. As you can see he could've just taken a picture of the tide from the sea, and in fact it would have made a good shot. But Andy likes to go the extra step to add the unusual into his work.

This is also a picture of Andy Goldsworthy that I feel is quite impresive. The picture is simple but has a special feel to it. Andy has taken this picture at the right time of day with the right light and perhaps at the right time of the year. It looks like this phot was taken in the winter season as it has a cold and misty feel to it. This is great because if he was to take this photo at any other time of the year it wouldn't look as good.

So Andy Goldsworthy I feel is a great photographer especially when it comes to taking picutres of weird objects and creations alongside natural things like water, fields and flowers etc. His work has given me many ideas for my work and has helped me out alot with different additional objects I could use for my photographs.

Tuesday, 12 October 2010

F Stop/Shutter Speed Task

For this task I had to go out and use my camera to take many different photographs using different shutter speeds and F stops using manual settings. The idea of this task is to get used to using the different manual settings on the camera and see what effects they can lead to.

Because my theme is water photography I decided to go to an abandoned bridge by the River Trent. The Light was really good because I went out in the morning and the sun was beaming.


1/160 F5.6
 This was the first photograph I took. As you can see the photograph is too bright, this is due to the camera settings I had whilst taking the photograph. The settings were set to 1/160 and the F Stop 5.6. The reason the photo ended up like this is due to the settings I had set on the camera alongside with how bright it was outside aswell.


1/500 F7.1
 So after i had taken the first photograph I then changed the settings on the camera to adjust to the surrounding light. It took a few more attempts to get the shot right with the correct settings, this was one of the best photographs I managed to take. For this shot I set the camera to 1/500 for the shutter speed because all of the other shutter speeds before this were too slow and were letting too much light in, the F Stop was set to 7.1, perfect for the amount I wanted in the photograph.


1/400 F 7.1
So after I had finished with the photographs of the bridge head on, I then went to the side of the bridge where I was situated pretty much underneath one of its arches. This was the first shot I took, it wasnt bad but I had only altered the settings a tiny bit from the photograph I had taken before. I had set the camera to 1/400 F Stop 7.1. So as you can see the picture does look darker than the one before, this is because of the amount of light was a lot lower due to standing near to the bridges arch and the sunlight had also gone down. This led to the picture being darker because the shutter speed was set quite quick to let less light in.


1/200 F 7.1
 This was the photograph I took after lowering the shutter speed. As you can see the picture has become very bright, too bright infact. This is due to the shutter speed I had set, I had set it so that the camera would take a tiny bit more longer to take the photograph to let more light it but it was set to slow. I think that if i took a photograph with a shutter speed set to 1/320 and an F Stop of 5.6 I would've taken the perfect shot for the amount of surrounding light there was.

1/80 F 5.6
 Ok so away from the water theme I decided to take a look around to see if there was anything out I could test my camera on. I had found a hedgehog sitting by some grass minding its own business. So i tried to get as close as I could to take a good photograph of it. I set my shutter speed to 1/80 because the light had faded quite alot and due to how close I was to the hedgehog and my F Stop set to 5.6. As you can see the photograph turned out very nice with the right amount of light in the picutre. I only wish I had a Macro lense to take some more better pictures of the hedgehog.

I feel that I have managed quite well on this task bearing in mind I am still a beginner. My photographs werent great but I am just trying to test all of the different manual settings on the camera to get the perfect picture whilst deciding what settings to have alongside the surrounding light. I will be going out again proberbly to the same place to practise some more at a different time of day to test what settings I would need with a different amount of light.

D1

Thursday, 7 October 2010

Photoshop Task

For this task we were asked to show how we can use different methods to make a photograph turn black and white, and how to use different tools to show how we can turn half the picture black and white and the other half in colour.
There are four different methods of turning a photograph black and white and from each you can then add more effects to make them stronger or weaker. The four different methods are listed below:

* Black and White
* Desaturate
* Hue/Saturation
* Channel Mixer

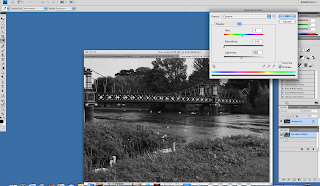
Black and White Method
This is the black and white method that I used. This at first makes the photograph turn black and white and then you can add different effects to the black and white to make the effect stronger or weaker. For example with this effect you can change how strong the reds, blues and yellows are etc but it will just change how strong the black and white is in the photo.
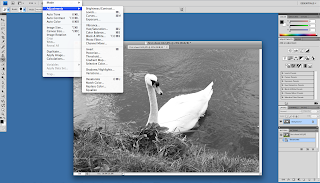

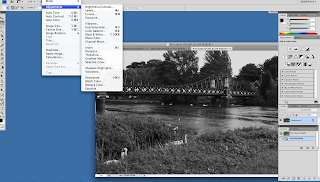
Desaturate
  This is the desaturate method. I have only taken a screen grab of how to actually get to the menu to do this effect as when you add it, it just turns the picture black and white with no other effects to add. Hoever you can access the different effects and add them as another layer to the desaturated picture.

Hue/Saturation 1


Hue/Saturation 2
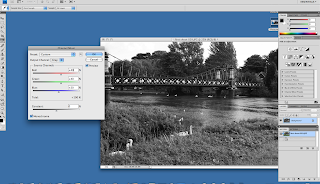
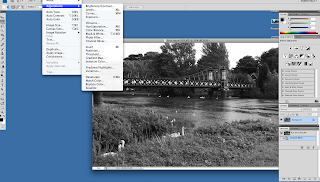
This is the Hue/Saturation effect that I used on a photograph. As you can see this effect also turns the photo black and white. With this effect you can also change the hue, saturation and lightness of the photograph to create different effects within the photo. This is one of my favourite effects because you can make some strong dark effects on most pictures.
Channel Mixer 1


Channel Mixer 2
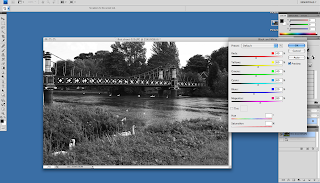
 This is the channel mixer effect. This is also a very good effect for getting different shades of black and white onto a photograph. Before you do anything with this effect the first main thing to do is tick the monochrome box. By doing this it will turn the image black and white straight away. This method of black and white can also be played around with to add different shades to the photo. By doing this you can end up with some interesting results for certain areas of the photo.


Half Black and White Half Colour 1
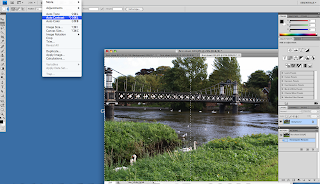
 For this task I was also asked to use a picture and make half of it go black and white and keep the other half in colour. So by doing this i used the crop tool to select half of my image that I wanted to turn black and white as shown above.


Half Black and White Half Colour 2
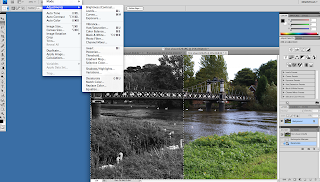
 After I had selected what part of the image I wanted to turn black and white I then clicked on image, adjustments and then desaturate because i just wanted the part I had selected to be straight black and white with no other effects. This then turned the part of the image I had selected black and white with some good results.
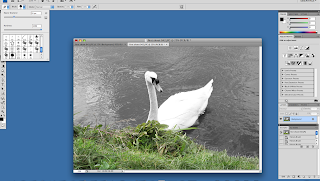


Part of Picture in Colour
 This effect that I used was slightly more complex than the other effects that I previously used. I was asked to use an image and then turn only part of the image into colour and then leave the res black and white. For this firstly I had to turn the picture black and white so that it added into the history box in the bottom right hand colour of the screen grab. Again I used the desaturate effect to turn the image black and white. After this I then clicked on the history button from the tool bar on the left hand side. I then selected the size of brush I wanted and then quite simply clicked and dragged over the area i wanted to turn back to colour. So I wasnt adding colour I was simply returning the image back to it's original state manually.

I feel that this task went well as I understood everything I was told and I managed to undertake the task fully understanding what I needed to do and how to do it. If I was to do this task again I would be more adventurous and create more different effects using more advanced tools to create more interesting results.

D1

Wednesday, 6 October 2010

Composition

For this task I was given all the different types of composition in which I had to give examples of. There are many different types of composition, here are most of them:

* Balance of Colour
* Balance of Tone
* Line to Guide the Eye
* Frames Within Frames
* The Rule of Thirds
* Balance of Texture
* Patterns

For this task I had to go out and take pictures taking into account the different types of composition. Here are a few images I captured.


This was one of the best shots that I took for the task. It falls into the pattern category. I found a monument which had this design all over it so I zoomed right into the pattern on it.

This shot was a landscape shot that I took of the river. This shot falls into the rule of thirds and line elements.
This shot that I took was taken on a bridge over the River Trent. I took the picture using the framework of the bridge to make the picture fall into the Frames Within Frames composition. This shot didn't appear as i thought it would because the background ended up blurred when it wasn't supposed to be.
 Although this image appears to be very dark I tried to gain the Lines to Guide the Eye composition by having a pathway leading into the unknown. I think that if I was to take this shot again I would have the photograph a little bit brighter to see a little bit more where the pathway is leading.

These are a few of the pictures that i feel were the best ones to fall into the different types of composition. I will be adding more throughout the rest of this unit.

Same Shot, Different Times of the Day Task

I have been set a task to complete. For this task I have to four pictures of the same thing at the four different times of the day. These are:

*Morning
*Midday
*Evening
*Night

For this I chose to take a landscaped theme of Burton-upon-Trent as I feel that it would be a very good type of picture to take for the task.


This was the morning shot that I took. I took this shot at 9:40.
This was the afternoon shot that I took. This shot was taken at 14:05.
This was the evening shot I took. This was taken at 18:30.
This was the night shot that I took. This was taken at 21:30

As you can see these photographs all look very different due to the light and time of day. I feel this exercise went very well as I picked a good theme to complete the exercise. I would like to attempt this exercise again using a different theme to see how different the images look.

My Camera and First Practise Shoot

I now have my very own camera, I have a Canon D1000 as shown below.


I have been out on my first practise shoot to get used to the camera and the manual settings to see what different photographs they can take. Here is one of my best shots I got of the River Trent.
1/60, F8.0
                                                            
This was one of the best shots I got. I was using different manual settings to adjust to the light and finally got there. For this shot I used 1/60 and F8.0 as the settings to get the right shot for the amount of light that there was. I used these settings because the surroundings were very bright for the shot.

I feel that I still need alot of practise with the camera and the different settings so I will be going out on another practise shoot again to improve after I have done some further research.

Ideas

I have done some research and decision making to what theme of photographs I am going to take, the theme I chose was water. The reason I have chose this theme is because I feel that i will be able to capture all different types of photograph which include water. For example:

* Rivers
* Water Droplets
* Frozen Water
* Streams

These are a few different sub catagories for the theme I have chosen.